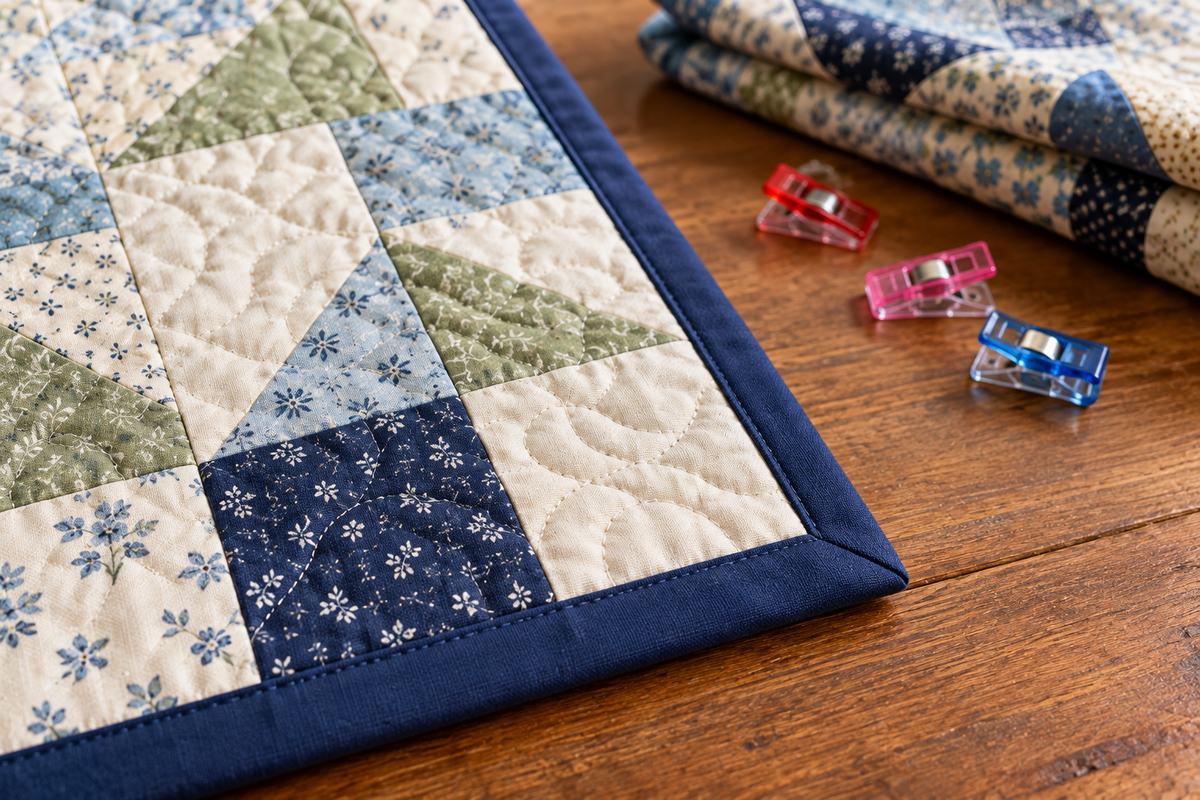
Binding is the strip of fabric that wraps around a quilt's raw edge and holds the top, batting, and backing together. To bind a quilt, you cut fabric strips about 2 1/4 to 2 1/2 inches wide, join them into one long strip, and fold it in half. Then you sew it around the front edge with folded corners, join the two ends, and fold it over to the back to stitch it down by hand or by machine.
QuiltGearHQ is a participant in the Amazon Services LLC Associates Program, an affiliate advertising program designed to provide a means for sites to earn advertising fees by advertising and linking to Amazon.com.
None of those steps is hard on its own. Most problems happen in three places: running short of binding, bulky corners, and the final join where the two ends meet. This guide explains each one. The planner below works out the numbers for your quilt, so you know how many strips to cut and how much fabric to buy before you start.
Table of Contents
What You Need Before You Start
Square the quilt first. Binding follows whatever edge it is sewn to, so a wavy or crooked edge stays wavy after you bind it. If you have not trimmed yet, our guide to how to square up a quilt covers checking the corners and cutting the extra batting and backing away.
For the binding itself, you need:
- Binding fabric, usually quilting cotton. The planner below tells you how much.
- A rotary cutter, a self-healing cutting mat, and a long ruler. A 6-by-24-inch ruler with a 45-degree line, such as the Omnigrip 6 x 24 inch ruler, handles both the strips and the angled joins.
- Pins or binding clips to hold the folded strip in place. Clover Wonder Clips grip all the layers without poking holes, and their flat base slides under the presser foot.
- A walking foot, which is helpful but not required.
- A hand needle and thread that matches the binding, if you plan to finish by hand.
A walking foot feeds the top and bottom layers through the machine at the same speed. That keeps the binding from stretching or bunching as it goes over the thick quilt edge. Our walking foot guide explains how to find one that fits your machine.
Two extras are nice to have. A washable basting glue such as Roxanne Glue-Baste-It holds the binding in place on the back while you stitch, which helps a lot if you finish by machine. A plastic template called The Binding Tool helps you measure the two tails for the final join.
How Much Binding Do You Need?
Measure around the quilt, then add extra for seams and corners. Double the length and width, then add about 10 to 15 inches. A 60 by 72 inch quilt is 264 inches around, so you would make about 276 inches of binding with 12 inches extra.
To turn that into strips, divide by 40. Quilting cotton is usually about 42 to 44 inches wide, but after you trim the selvages (the tightly woven edges along each side) and lose a little at each joining seam, you can use about 40 inches per strip. Always round up. For the 60 by 72 quilt, 276 divided by 40 is 6.9, so you cut 7 strips.
Finally, multiply the number of strips by the strip width to see how much fabric the strips use. Seven strips cut 2 1/2 inches wide take 17 1/2 inches of fabric. Buying a few extra inches lets you straighten the edge before you cut.
The planner does all of this at once, and it also gives you the overlap to use for the final join.
Quilt Binding Planner
Enter your quilt size. The planner works out how much binding you need, how many strips to cut, how much fabric to buy, and the overlap to use when you join the ends.
Quilt Binding Planner by QuiltGearHQ.com. Free to use. Results are estimates based on the numbers you enter, so measure your quilt after trimming.
Binding Fabric for Common Quilt Sizes
This chart uses the same method as the planner: the distance around the quilt plus 12 inches, 40 usable inches per strip, and 5 extra inches of fabric to straighten the edge. Quilt sizes vary widely from one pattern to another, so use the closest row or enter your exact size in the planner.
| Quilt size (inches) | Binding length | Strips to cut | Fabric with 2 1/4 in strips | Fabric with 2 1/2 in strips |
|---|---|---|---|---|
| Baby or wall, 36 x 36 | 156 in | 4 | 1/2 yd | 1/2 yd |
| Crib, 45 x 60 | 222 in | 6 | 5/8 yd | 5/8 yd |
| Throw, 60 x 72 | 276 in | 7 | 5/8 yd | 5/8 yd |
| Twin, 72 x 90 | 336 in | 9 | 3/4 yd | 7/8 yd |
| Full, 81 x 96 | 366 in | 10 | 7/8 yd | 7/8 yd |
| Queen, 90 x 108 | 408 in | 11 | 7/8 yd | 1 yd |
| King, 120 x 120 | 492 in | 13 | 1 yd | 1 1/8 yd |
Choosing the Strip Width
Most quilters cut binding strips 2 1/4 or 2 1/2 inches wide. A 2 1/4 inch strip suits thin cotton batting and gives a slim, snug edge. A 2 1/2 inch strip has more fabric to wrap around a puffy quilt, and it is a little more forgiving if your seam is not perfectly even. The Utah State University Extension sewing guide on double binding gives the same rule: 2.25 inches for thin batting and 2.5 inches for thick batting.
If you are not sure which you need, fold a short scrap strip in half and lay it over the quilt edge. It should wrap to the back and cover the line where the front stitching will go, with a little room to spare. If it barely reaches, use a wider strip. Our guide to types of quilt batting explains which battings are thin and which are puffy.
How to Cut and Join the Binding Strips
Cut your strips across the fabric from selvage to selvage. This is called straight-grain, or cross-grain, binding, and it works for any quilt with straight sides.
To join the strips, lay one strip face up. Place a second strip face down across its end so the two form an L. Sew a diagonal line from corner to corner across the overlap, trim the seam to 1/4 inch, and press it open. A diagonal seam spreads the bulk out along the strip instead of stacking it in one spot, so the finished binding stays flat. Some quilters cut the strip ends at 45 degrees first and sew them together that way. Both methods give the same angled seam.
Once you've joined all the strips, fold the long strip in half lengthwise with the wrong sides (the back of the fabric) together and press. The raw edges sit together on one side and the fold on the other. This is called double fold binding, and it is the most common choice for quilts because two layers of fabric hold up to washing and wear.
How to Sew the Binding to the Quilt
Decide how you will finish before you start sewing, because it changes which side you sew first.
- To finish by hand, sew the binding to the front of the quilt first.
- To finish by machine, you can sew it to the back first, or follow the stitch-in-the-ditch method in the finishing section below.
Lay the binding around the quilt before you sew to check where the joining seams fall. A seam that lands right at a corner is hard to fold neatly, so shift your starting point a few inches if one does.
Start in the middle of one side, not at a corner. Line up the raw edges of the binding with the quilt edge, leave a tail about 8 inches long, and start sewing with a 1/4-inch seam. After an inch or two, fold the binding over the edge to check that the folded edge will cover the stitching on the other side. Adjust your seam now if it will not.
Many quilters lengthen their stitch a little for binding because the needle goes through several thick layers. A walking foot keeps every layer moving together and helps the binding lie flat.
How to Miter the Corners
A mitered corner is the neat diagonal fold you see on a well-bound quilt. It takes three moves.
- Stop sewing 1/4 inch before the corner and backstitch, which means sewing a few stitches in reverse to lock the thread. Lift the presser foot and turn the quilt so you can sew down the next side.
- Fold the binding straight up, away from the quilt, so it makes a 45-degree angle at the corner.
- Fold it back down along the next edge, keeping the top fold even with the edge you just sewed. Start sewing again from the very edge and keep going.
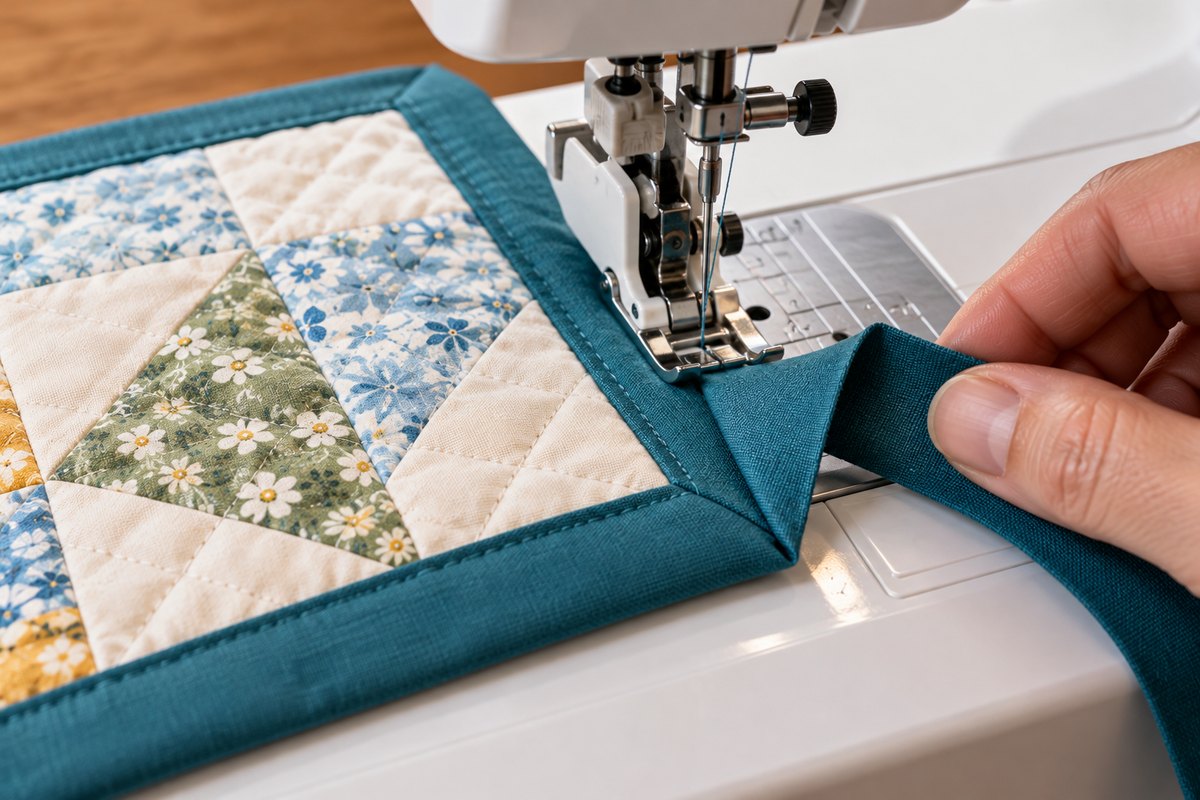
That small fold hidden under the binding becomes the diagonal line when you flip the binding to the back. Repeat at every corner.
How to Join the Binding Ends
The last join is the step most new quilters dread, but a simple rule makes it work: the two tails overlap by exactly the width of your strip.
- Stop sewing about 12 inches from where you started. Take the quilt off the machine.
- Lay both tails flat along the unsewn edge. Fold each one back so the two folds meet in the middle of the gap, leaving about 1/8 inch between them, and press the folds with your fingers.
- Cut the first tail on its fold. Then measure from the fold of the second tail a distance equal to your strip width, 2 1/2 inches for a 2 1/2 inch strip, and cut there. The tails now overlap by exactly one strip width.
- Open both tails. Lay them right sides (the printed fronts) together at a right angle, the same L shape you used to join the strips, and pin.
- Sew a diagonal line across the square where they overlap. Before you trim, refold the binding and lay it on the quilt to check that it fits snugly.
- Trim the seam to 1/4 inch, press it open, refold the binding, and sew the last section down.
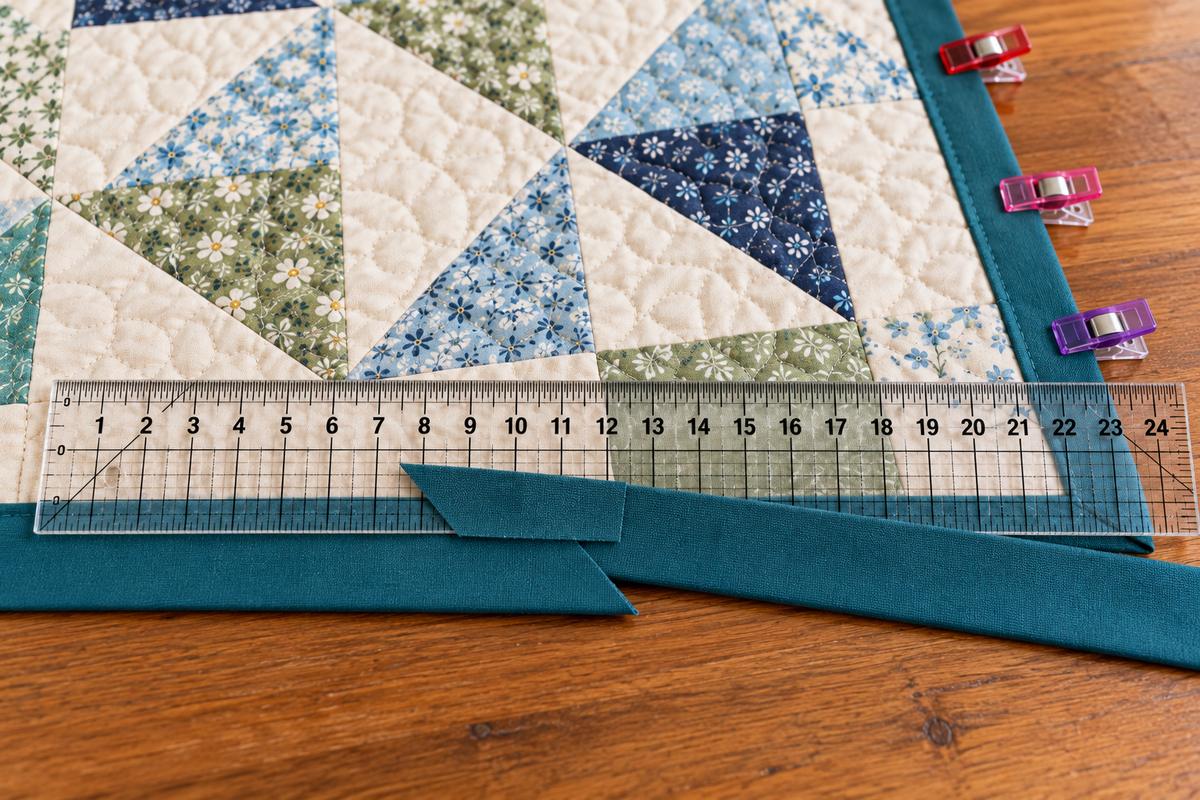
If the join comes out loose, the overlap was too long. If you cannot reach the ends together, it was too short. A binding tool, like the one mentioned near the top of this guide, has marks that make this measurement easier, but a ruler works fine.
How to Finish the Binding by Hand or by Machine
Fold the binding to the back of the quilt so it covers the stitching line. Fold the corners into a miter on the back, too. Fold one side down, then the next, and the corner forms its own diagonal line. Clips or a little washable glue hold everything in place while you stitch.
By hand. Use a needle and thread that match the binding. Take a small stitch into the backing, then slip the needle into the binding fold and come out a short way along. Pull each stitch firm, but not so tight that the fabric puckers. The stitches hide in the fold, which is why hand finishing looks so clean. It takes longer than machine finishing.
By machine. There are two common ways.
- Sew the binding to the back first, fold it to the front, and stitch along the folded edge. You'll see the stitching line on the front, so it looks like a small border.
- Sew the binding to the front first, fold it to the back, and glue or clip it so it covers the stitching line by about 1/8 inch. Then stitch in the ditch from the front, right in the seam between the binding and the quilt. The stitches go through the binding on the back but barely show on the front.
Machine binding is faster and holds up well to frequent washing, making it a good choice for baby quilts, picnic quilts, and anything that gets washed often. Check the back as you go. If you miss a spot, you can go back and stitch just that section.
How to Fix Common Binding Problems
| Problem | Likely cause | How to fix it |
|---|---|---|
| The binding does not cover the stitching on the back | The strip is too narrow for the batting, or the seam was too wide | Cut 2 1/2 inch strips for thick batting, and check the fold after the first few inches of sewing |
| Too much binding shows on the back | The strip is wider than this quilt needs | Use 2 1/4 inch strips with thin batting |
| The edge ripples or waves | The binding was stretched as it went through the machine, or the edge was not square | Let the walking foot feed the binding without pulling, and square up the quilt before binding |
| A corner is lumpy or will not fold neatly | You sewed past the 1/4 inch stop point, or a joining seam landed at the corner | Unpick a few stitches back to 1/4 inch from the corner, and plan seam spots before you start |
| The final join is loose or too short | The tails were not overlapped by the strip width | Unpick the join seam, recut the overlap to match your strip width, and sew it again |
| You run out of binding | The measurement left no extra, or strips came out short | Use the planner and add 10 to 15 inches, then sew one more strip on if needed |
| The binding feels bulky where strips join | The strips were joined with a straight seam or the seam was pressed to one side | Join strips with a diagonal seam and press it open |
Bias Binding for Curved Edges
Straight grain strips do not bend around curves well. For a quilt with scalloped or rounded edges, cut the binding on the bias, at a 45-degree angle to the selvage. Bias strips stretch a little, so they curve smoothly without puckering.
You can cut bias binding from a square and turn it into one long strip, often called continuous bias. To find the size of the square you need, multiply the binding length by the strip width and take the square root. For 156 inches of binding cut 2 1/2 inches wide, that is 390 square inches. The square root is about 19.75, so a 20-inch square is enough. Choose Bias in the planner, and it does this math for you.
How to Bind a Quilt: Common Questions
What is the easiest way to bind a quilt for beginners?
Double fold binding cut 2 1/2 inches wide and sewn on with a walking foot is the most forgiving choice. Machine finishing is faster than hand finishing, though hand finishing hides the stitches better. Either way, start in the middle of a side and leave long tails so the final join is easy.
How wide should I cut quilt binding strips?
Most quilters cut 2 1/4-inch strips for thin cotton batting and 2 1/2-inch strips for thicker or puffier batting. Fold a scrap over your quilt edge to check that it wraps to the back with a little room to spare.
How much extra binding should I add?
Add about 10 to 15 inches to the quilt's perimeter. The extra covers the diagonal seams, the folded corners, and the overlap at the final join. On a very large quilt, staying near the top of that range gives you more room to work.
Should I bind a quilt by hand or by machine?
Hand finishing hides the stitches inside the binding fold and gives a traditional look. Machine finishing is faster and holds up well to frequent washing. Many quilters use the machine for everyday quilts and save hand finishing for gifts and show pieces.
Do I need a walking foot to bind a quilt?
No, but it helps. A walking foot feeds the binding and all the quilt layers at the same speed, which keeps the binding from stretching or bunching. Without one, sew slowly and let the machine pull the fabric instead of pushing it.
Your Next Step
Binding is the last part of making a quilt, and it is the part people touch most. Once the edge is square and your strips are cut, the work goes quickly. Use the planner to cut the right amount, stop 1/4 inch before each corner, and remember the overlap rule for the final join. The rest is steady sewing.