
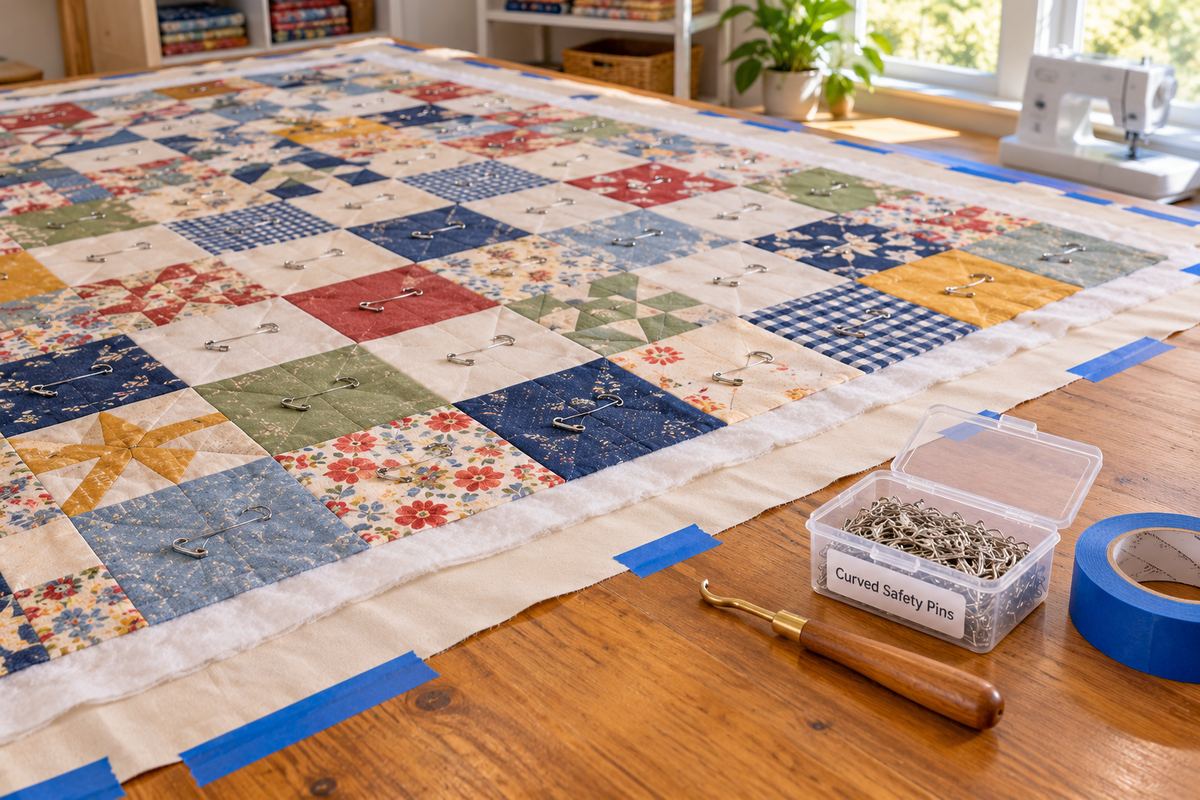
Here is how to baste a quilt. Lay the backing wrong side up and tape it flat, smooth the batting on top, and center the quilt top right side up. Then hold the three layers together with safety pins about every 4 inches, basting spray, long thread stitches, or fusible batting. Basting keeps the layers from shifting while you quilt, a common cause of puckers and tucks on the back.
QuiltGearHQ is a participant in the Amazon Services LLC Associates Program, an affiliate advertising program designed to provide a means for sites to earn advertising fees by advertising and linking to Amazon.com.
This guide compares the main basting methods, shows each one step by step, and includes a free planner to calculate your backing size and how many pins or how much thread you need. It picks up where our quilt backing guide leaves off and comes before binding.
Table of Contents
What Basting Does
A quilt is a three-layer sandwich: the backing, the batting, and the quilt top. When you quilt, the machine or your hand pushes and pulls on these layers. Without anything holding them together, they slide apart. The fabric then bunches up and gets stitched into small folds, called tucks or pleats.
Basting holds the layers in place just long enough for you to quilt them. It is temporary. Pins and basting thread come out as you go, and basting sprays and the glue on fusible batting wash out. The University of Kentucky Cooperative Extension recommends spacing basting pins so the fabric doesn't shift.
If you send your quilt to a longarm quilter, you usually do not baste it yourself. See the longarm section below.
Which Basting Method Should You Use?
There is no single best method. It depends on how you will quilt, how big the quilt is, and how much space you have. The time estimates come from Missouri Star Quilt Co.'s basting guide and are for a queen quilt. Your own time will vary.
| Method | Best for | Time for a queen | Watch out for |
|---|---|---|---|
| Safety pins | Machine quilting, beginners, most quilt sizes | About 45 to 90 min | Pins have to come out as you quilt. Closing hundreds of pins is hard on your fingers. |
| Basting spray | Fast basting, free-motion quilting, smaller quilts | About 15 to 20 min | Flammable spray, needs good airflow, overspray. Some sprays lose their hold within days. |
| Thread basting | Hand quilting, delicate fabrics | 2 hours or more | The slowest method |
| Board basting | Small rooms with no floor space | About 30 to 60 min | You still pin, spray, or stitch each section |
| Fusible batting | Quick projects, smaller quilts | No estimate | Limited choice of batting. You can only lift it and press it again once or twice. |
| Glue basting | Small quilts you will wash when done | At least 12 hours of drying time | Glue can show until the quilt is washed |
If you are learning how to baste a quilt for the first time and will quilt on a home machine, start with safety pins. They are cheap, reusable for years, and you can fix a wrinkle by moving a pin. Spray is the fastest choice once you are comfortable. Thread basting is the classic choice for hand quilting because no pins can catch on a hoop.
Before You Start: Prepare the Layers
Every method starts the same way. Good preparation matters more than the method you choose because a wrinkle you basted in will get quilted in.
- Cut the backing and batting bigger than the top. The University of Kentucky Extension recommends cutting the backing 2 to 4 inches larger than the quilt top on all four sides, and Missouri Star Quilt Co. recommends 4 to 6 inches. Use 4 inches if you are not sure. This gives the quilt room to shrink a little as you stitch.
- Press the backing and the quilt top. Press the seams flat, and trim loose thread tails so they don't show through the light fabric.
- Let the batting relax. Unfold it and let it lie flat for a while so the fold lines ease out.
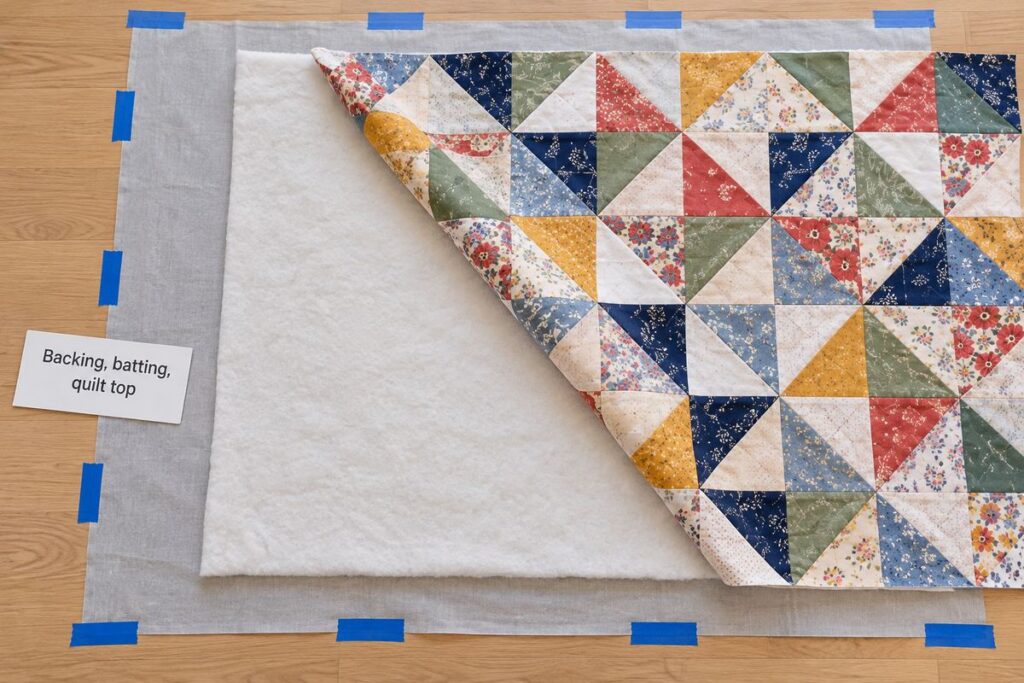
- Tape the backing down. Lay the backing face down on a clean floor or a large table. Tape the edges every few inches with wide painter's tape, or clamp them to the table edge with binder clips. Pull it smooth and taut, but do not stretch it out of shape. On carpet, lay down a sheet of plywood or foam board first.
- Add the batting. Center the batting on the backing and smooth it out from the middle with your hands. Do not stretch it. NewQuilters warns that stretched batting can pull and cause puckers after quilting.
- Add the quilt top. Center the top right side up on the batting. Fold it in half to find the middle, align it with the middle of the backing, and smooth it toward the edges.
The layers are now ready to baste with the method you chose.
Quilt Basting Planner
Use the planner to find the size to cut your backing and batting, and how many safety pins or how much basting thread to plan for. It also gives the key steps for spray and fusible batting.
Quilt Basting Planner
Pick your quilt size and basting method. The planner shows how big to cut the backing and batting, and how many pins or how much basting thread to plan for.
Guides suggest 2 to 6 in on every side. 4 in is a safe choice.
Quilt basting planner by QuiltGearHQ · quiltgearhq.com
How to Pin Baste a Quilt
Pin basting uses curved safety pins. The curve lets the pin dip down through all three layers and come back up without lifting the quilt off the table.
What You Need
- Curved basting safety pins. Size 1 (about 1 inch) works for thin batting and size 2 (about 1 1/2 inches) for thicker batting. Nickel-plated pins resist rust if they stay in the quilt for a while.
- A Kwik Klip, a grapefruit spoon, or a teaspoon to help close the pins and save your fingers
- Painter's tape or binder clips
Pin Basting Steps
- Prepare and tape the layers as shown above.
- Start in the center of the quilt. Push a pin down through all three layers, bring it back up, and leave it open for now.
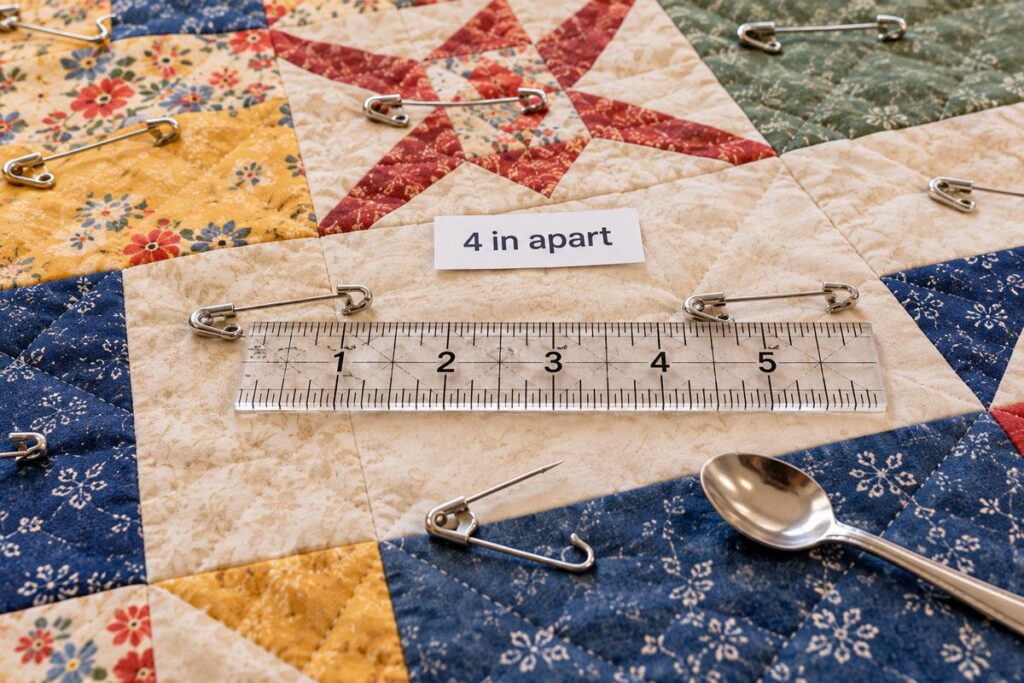
- Work outward in rows, placing pins about every 4 inches. A good guide is to keep pins about a fist-width apart.
- Keep pins off the lines you plan to quilt, such as seams you will stitch in the ditch (right along the seam line). Put them in the open areas of each block.
- Close the pins once the whole quilt is pinned, using a Kwik Klip or a spoon to lift the tip into the clasp.
- Remove the tape and turn the quilt over. Run your hand over the back. If you find a fold, take out the nearby pins, smooth the area, and pin it again.
Guides disagree a little on spacing. The University of Kentucky Extension and Janome both recommend about every 4 inches, the most common answer. NewQuilters says 3 to 4 inches, and closer for thick batting. A Utah State University 4-H lesson places pins every 2 to 3 inches along the edges and about 6 to 8 inches apart in the middle. If you are not sure, use 4 inches.
Remove each pin when it gets close to your presser foot. Never sew over a pin, since it can break the needle.
How to Spray Baste a Quilt
Basting spray is a temporary fabric glue. It holds the layers together without pins, so nothing gets in the way of your presser foot. Our guide to the best basting spray for quilting compares the main brands.
Spray Basting Steps
- Work in a well-ventilated room, or outside on a calm day. Cover the floor and nearby surfaces with paper or an old sheet to catch overspray.
- Shake the can well.
- Fold back half of the quilt top. Spray the exposed batting with a light, even coat. Odif, the maker of 505 Spray and Fix, says to spray directly onto the batting from about 10 inches away, moving side to side.
- Smooth the top back down over the sprayed batting, working from the center out. Repeat for the other half.
- Turn the layers over, or fold back the batting, and baste the backing to the batting the same way.
- Quilt soon after basting. Missouri Star Quilt Co. says the hold weakens over time, so plan to quilt within a few days. Some brands hold longer, so check the can.
Guides disagree on which layer to spray. The spray makers say to spray the batting, while some quilters spray the backing fabric instead. Spraying the batting keeps the spray off your fabric, so it is a good place to start.
Safety: Odif's product page says 505 is extremely flammable and that its vapors may cause a flash fire. Its safety data sheet says to use it in a well-ventilated area and keep it away from heat, sparks, and open flames. June Tailor gives the same flammable warning for its quilt basting spray. Keep the can out of reach of children.
Odif and June Tailor both say their sprays will not gum up your needle. NewQuilters says some sprays can leave residue that builds up. If you see it, Missouri Star Quilt Co. suggests wiping the needle with rubbing alcohol. Use a lighter coat next time.
How to Thread Baste a Quilt
Thread basting means sewing long, loose running stitches through all three layers by hand. It takes the longest, but it is the classic choice for hand quilting, because there are no pins to catch on a hoop or frame.
- Prepare and tape the layers as shown above.
- Thread a long needle with thin cotton thread in a color that stands out from the quilt, so you can easily see the stitches and pull them out later. Leave a long tail instead of a knot, or tie a large knot that will not pull through.
- Start in the center. Stitch one line down the middle from top to bottom, then one line across the middle from side to side.
- Keep stitching lines out toward the edges to make a grid. The University of Kentucky Extension recommends spacing basting stitches 4 to 6 inches apart.
- Take long stitches. Quilting guides suggest stitches from about 1 inch to 3 or 4 inches long. Longer stitches are faster and still hold the layers.
- A spoon helps lift the needle tip back up through the layers without poking your finger.
Some quilters use a spiral from the center instead of a grid. Either works, as long as the lines are close enough that the layers cannot shift.
How to Baste with Fusible Batting
Fusible batting has a heat-activated glue on one or both sides. Press the quilt top and backing onto it with an iron, and the glue holds the layers until you wash the quilt. It is quickest on smaller quilts. On a big quilt, take your time so you press every spot.
Follow the batting maker's directions. These steps come from Hobbs for its Heirloom 80/20 Fusible batting, which has glue on both sides:
- Lay the layers out as usual, with the batting between the backing and the top.
- Use a dry iron set to the right heat for your fabric. Hobbs says to use no steam, and that the batting will not stick if it gets wet.
- Start in the center. Press one spot for about 5 to 7 seconds, lift the iron, and move to the next spot. Do not slide the iron.
- Work out to the edges, then turn the quilt over and press the back the same way.
Hobbs says you can lift and press a layer again only once or twice before the glue stops holding. It also says to quilt no more than 4 inches apart with this batting, and that the glue washes out and the quilt softens after washing.
Some quilters use steam with other fusible battings. Each brand is different, so read your label.
Glue Basting
Glue basting uses washable school glue instead of pins or spray. One method, from the blog Quilting Gail, mixes 1 part washable school glue with 4 parts water and brushes it thinly onto the batting. Then smooth the fabric over it, press it with an iron to dry, and let the quilt sit for at least 12 hours before quilting.
The writer says the glue can show and leave marks on the fabric until the quilt is washed. Use this method only on a quilt you plan to wash when it is done. She also wrote that she had not tried it on quilts larger than about 50 x 50 inches. For a large quilt, pins or spray are easier.
Board Basting for Small Spaces
If you do not have a big table or open floor, you can baste on boards. Roll the quilt top around one long board and the backing around another. Unroll a section of each, lay the batting between them on a table, and baste that section with pins, spray, or thread. Then roll forward to the next section and repeat. The Textile Ranger blog describes this method, which the writer learned from quilter Sharon Schamber, and she basted each section with thread. Missouri Star Quilt Co. pins or sprays each section instead.
Missouri Star says to use boards 5 to 10 inches longer than the quilt's width. This method needs only a regular table, but it takes some practice to keep the layers straight as you roll.
Do You Need to Baste for a Longarm?
No. A longarm frame holds the backing and quilt top on separate rails, with the batting floating between them. Longarm quilting services, such as Gather Here and Nebraska Quilt Co., ask you to send the top and backing as separate pieces, not basted together. They also want a bigger backing than you would use at home, often 4 inches or more extra on every side, so ask your quilter first.
The longarm quilter may stitch a basting line across the top edge and down the sides once the quilt is loaded. WeAllSew and Handi Quilter both describe this step. Our beginner's guide to longarm quilting explains how the frame works.
Fixing Common Basting Problems
| Problem | Likely cause | What to do |
|---|---|---|
| Tucks or pleats on the back | The backing was not smooth and taut when you basted, or the layers shifted | Tape the backing taut before you add the batting. Pull the nearby pins, smooth the area, and pin again before you quilt. |
| Layers shift while quilting | Too few pins, or too light a coat of spray | Add more pins, or spray another light coat. Pin closer with thick or slippery batting. |
| Puckers in straight-line quilting | Loose basting, or the machine moving the bottom layer faster than the top | Baste closely and use a walking foot, which moves all the layers through the machine together. Janome says these feet make a big difference. |
| Pins catch on the presser foot | Pins placed on the quilting lines | Keep pins off the lines you plan to stitch, and take each one out before it reaches the foot. |
| Sticky needle after spray basting | Too much spray | Wipe the needle with rubbing alcohol and use a lighter coat next time. |
| Fusible batting will not stick | Steam or a wet batting | Use a dry iron with no steam, as Hobbs directs, and press instead of sliding the iron. |
Free-motion quilters also find that quilting gloves help them move the basted quilt smoothly.
Tools That Help
These are common basting supplies we checked on Amazon in October 2026. We have not tested them ourselves, and prices change.
- Dritz Quilting Curved Safety Pins, Size 1, 300 count. Enough curved pins for a throw on a full grid, or a queen if you pin less closely. Sold by Amazon.
- Kwik Klip pin closing tool. A wood handle with a brass tip for closing safety pins without sore fingers.
- Odif 505 Spray and Fix, 7.2 oz. A popular temporary fabric spray from the maker whose directions are quoted above.
- Hobbs Heirloom 80/20 Fusible Batting, Queen. A 90 x 108 inch fusible batting with glue on both sides.
For more choices, see our guides to the best basting spray and the best quilt batting.
Quilt Basting Questions
Do you have to baste a quilt?
If you quilt it yourself on a home machine or by hand, yes. Basting keeps the layers from shifting. If a longarm quilter will finish it, you usually send the top and backing separately without basting.
How far apart should basting pins be?
About 4 inches apart is the most common advice, or about a fist width. Pin a little closer for thick or slippery batting.
How many safety pins do I need to baste a quilt?
A pin every 4 inches on a full grid comes to about 300 pins for a throw and about 600 for a queen. Most quilters use fewer. Missouri Star Quilt Co. says about 200 to 250 pins is enough for a queen. Our planner shows the most you'll likely need for your quilt.
Is spray basting better than pinning?
It is faster and leaves nothing in the way of your presser foot, but the sprays are flammable and need good airflow. Pins are cheaper over time and easier to adjust.
How much bigger should the backing be than the quilt top?
Guides range from 2 to 6 inches larger on each side for home quilting, and 4 inches is a safe choice. Longarm quilters often want more, so ask first.
Does basting spray wash out?
Odif says its 505 spray disappears when you wash the quilt. Check the can for your brand.
Can you use steam with fusible batting?
Not with Hobbs Heirloom 80/20 Fusible. Hobbs says to use a dry iron set for your fabric, with no steam, and that the batting will not stick if it gets wet. Other brands may differ, so read the label.
Bottom Line: How to Baste a Quilt
That is how to baste a quilt: tape the backing down smooth and taut, add the batting, center the top, and hold the layers together. For machine quilting, safety pins about every 4 inches are the easiest place to start. Spray is faster, thread basting is best for hand quilting, and fusible batting is quick on smaller quilts. Cut the backing and batting about 4 inches bigger than the top on every side, and check the back for folds before you start quilting.
This guide is based on extension service handouts, the spray and batting makers' own directions, and published quilting guides. The pin and thread amounts in the planner are our own math.